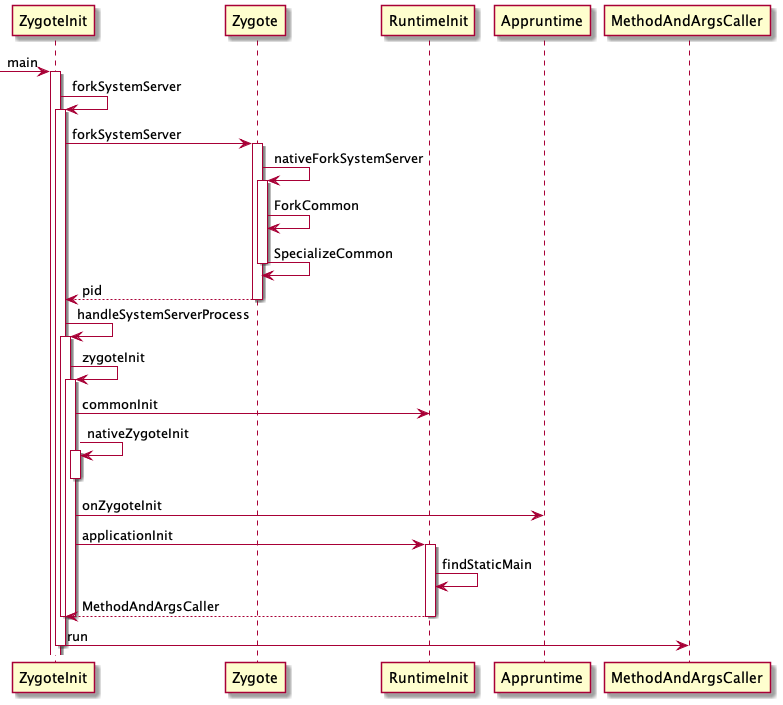
前言

Zygote 这篇文章中,我们提到 Zygote 会创建 SystemServer 进程,当时我们没有去了解。

今天就来聊一聊 SystemServer

Zygote

先来回顾一下 Zygote 启动 SystemServer 的代码在哪里 /frameworks/base/core/java/com/android/internal/os/ZygoteInit.java

 1
 2
 3
 4
 5
 6
 7
 8
 9
10
11
12
13
public static void main(String argv[]) {
    // ...
    if (startSystemServer) {
        // 创建 SystemServer 进程
        Runnable r = forkSystemServer(abiList, zygoteSocketName, zygoteServer);

        if (r != null) {
            r.run();
            return;
        }
    }
    Log.i(TAG, "Accepting command socket connections");
}

ZygoteInitmain 方法中会调用 forkSystemServer ,所以我们要从这里入手,看看 SystemServer 是怎么启动的。

Zygote -> SystemServer

/frameworks/base/core/java/com/android/internal/os/ZygoteInit.java

 1
 2
 3
 4
 5
 6
 7
 8
 9
10
11
12
13
14
15
16
17
18
19
20
21
22
23
24
25
26
27
28
29
30
31
32
33
34
35
36
37
38
39
40
41
42
43
44
45
46
47
48
49
50
51
52
private static Runnable forkSystemServer(String abiList, String socketName,
            ZygoteServer zygoteServer) {

    // ...

    String args[] = {
        "--setuid=1000",
        "--setgid=1000",
        "--setgroups=1001,1002,1003,1004,1005,1006,1007,1008,1009,1010,1018,1021,1023,"
        + "1024,1032,1065,3001,3002,3003,3006,3007,3009,3010",
        "--capabilities=" + capabilities + "," + capabilities,
        "--nice-name=system_server",
        "--runtime-args",
        "--target-sdk-version=" + VMRuntime.SDK_VERSION_CUR_DEVELOPMENT,
        "com.android.server.SystemServer",
    };
    ZygoteArguments parsedArgs = null;

    int pid;

    try {
        parsedArgs = new ZygoteArguments(args);
        Zygote.applyDebuggerSystemProperty(parsedArgs);
        Zygote.applyInvokeWithSystemProperty(parsedArgs);

        boolean profileSystemServer = SystemProperties.getBoolean(
            "dalvik.vm.profilesystemserver", false);
        if (profileSystemServer) {
            parsedArgs.mRuntimeFlags |= Zygote.PROFILE_SYSTEM_SERVER;
        }

        // fork 子进程,uid=1000,gid=1000, 进程名=system_server
        pid = Zygote.forkSystemServer(
            parsedArgs.mUid, parsedArgs.mGid,
            parsedArgs.mGids,
            parsedArgs.mRuntimeFlags,
            null,
            parsedArgs.mPermittedCapabilities,
            parsedArgs.mEffectiveCapabilities);
    } catch (IllegalArgumentException ex) {
        throw new RuntimeException(ex);
    }

    // 0 表示子进程
    if (pid == 0) {
        // 关闭从 Zygote 继承下来的 ServerSocket,因为用不到
        zygoteServer.closeServerSocket();
        return handleSystemServerProcess(parsedArgs);
    }

    return null;
}

args 中,我们能看出来 system serveruid=1000gid=1000 ,进程名为 system_server ,这里要注意最后一个参数 com.android.server.SystemServer 在后边会用到。

在参数准备好之后,会调用 Zygote.forkSystemServer 从而创建了 SystemServer 进程。跟进去看下是如何创建的

forkSystemServer

/frameworks/base/core/java/com/android/internal/os/Zygote.java

 1
 2
 3
 4
 5
 6
 7
 8
 9
10
11
12
13
14
15
16
17
public static int forkSystemServer(int uid, int gid, int[] gids, int runtimeFlags,
                                 int[][] rlimits, long permittedCapabilities, long effectiveCapabilities) {
    ZygoteHooks.preFork();
    resetNicePriority();
    int pid = nativeForkSystemServer(
        uid, gid, gids, runtimeFlags, rlimits,
        permittedCapabilities, effectiveCapabilities);
    // Enable tracing as soon as we enter the system_server.
    if (pid == 0) {
        Trace.setTracingEnabled(true, runtimeFlags);
    }
    ZygoteHooks.postForkCommon();
        return pid;
}

private static native int nativeForkSystemServer(int uid, int gid, int[] gids, int runtimeFlags,
                                               int[][] rlimits, long permittedCapabilities, long effectiveCapabilities);

forkSystemServer 中通过 JNI 调用 nativeForkSystemServerfork 任务交给了 Native

nativeForkSystemServer

/frameworks/base/core/jni/com_android_internal_os_Zygote.cpp

 1
 2
 3
 4
 5
 6
 7
 8
 9
10
11
12
13
14
15
16
17
18
19
20
21
22
23
24
25
static jint com_android_internal_os_Zygote_nativeForkSystemServer(
        JNIEnv* env, jclass, uid_t uid, gid_t gid, jintArray gids,
        jint runtime_flags, jobjectArray rlimits, jlong permitted_capabilities,
        jlong effective_capabilities) {

  // ...
  pid_t pid = ForkCommon(env, true,
                         fds_to_close,
                         fds_to_ignore);
  if (pid == 0) {
      SpecializeCommon(env, uid, gid, gids, runtime_flags, rlimits,
                       permitted_capabilities, effective_capabilities,
                       MOUNT_EXTERNAL_DEFAULT, nullptr, nullptr, true,
                       false, nullptr, nullptr);
  } else if (pid > 0) {
      // 父进程
      gSystemServerPid = pid;
      int status;
      // 如果 system server 死亡,重启 Zygote
      if (waitpid(pid, &status, WNOHANG) == pid) {
          RuntimeAbort(env, __LINE__, "System server process has died. Restarting Zygote!");
      }
  }
  return pid;
}

nativeForkSystemServer 中调用了 ForkCommon 创建子进程,然后在进程中调用 SpecializeCommon

Zygote 进程会检测 SystemServer 是否死亡,如果死亡则重启 Zygote ,生死与共。

ForkCommon

/frameworks/base/core/jni/com_android_internal_os_Zygote.cpp

 1
 2
 3
 4
 5
 6
 7
 8
 9
10
11
12
13
14
15
16
17
18
19
20
21
22
23
24
25
26
27
28
29
30
31
32
33
34
35
36
37
38
39
40
41
42
43
44
static pid_t ForkCommon(JNIEnv* env, bool is_system_server,
                        const std::vector<int>& fds_to_close,
                        const std::vector<int>& fds_to_ignore) {
    // 设置 single 信号处理函数
    SetSignalHandlers();

    auto fail_fn = std::bind(ZygoteFailure, env, is_system_server ? "system_server" : "zygote",
                           nullptr, _1);

    BlockSignal(SIGCHLD, fail_fn);

    __android_log_close();
    stats_log_close();

    if (gOpenFdTable == nullptr) {
        gOpenFdTable = FileDescriptorTable::Create(fds_to_ignore, fail_fn);
    } else {
        gOpenFdTable->Restat(fds_to_ignore, fail_fn);
    }

    android_fdsan_error_level fdsan_error_level = android_fdsan_get_error_level();

    // 创建子进程
    pid_t pid = fork();

    if (pid == 0) {

        PreApplicationInit();
        // 关闭描述符
        DetachDescriptors(env, fds_to_close, fail_fn);

        ClearUsapTable();

        gOpenFdTable->ReopenOrDetach(fail_fn);

        android_fdsan_set_error_level(fdsan_error_level);
    } else {
        ALOGD("Forked child process %d", pid);
    }

    UnblockSignal(SIGCHLD, fail_fn);

    return pid;
}

ForkCommon 进行了真正的 fork 创建了 system server

SpecializeCommon

/frameworks/base/core/jni/com_android_internal_os_Zygote.cpp

 1
 2
 3
 4
 5
 6
 7
 8
 9
10
11
12
13
14
15
16
17
18
19
20
21
22
23
24
25
26
27
28
29
30
31
32
33
34
35
36
37
38
39
40
41
42
43
44
45
46
47
48
49
50
51
52
53
54
55
56
57
58
59
60
61
62
63
64
65
66
67
68
69
70
71
72
73
74
75
76
77
78
79
80
81
82
83
84
85
static void SpecializeCommon(JNIEnv* env, uid_t uid, gid_t gid, jintArray gids,
                             jint runtime_flags, jobjectArray rlimits,
                             jlong permitted_capabilities, jlong effective_capabilities,
                             jint mount_external, jstring managed_se_info,
                             jstring managed_nice_name, bool is_system_server,
                             bool is_child_zygote, jstring managed_instruction_set,
                             jstring managed_app_data_dir) {
  const char* process_name = is_system_server ? "system_server" : "zygote";

  SetInheritable(permitted_capabilities, fail_fn);

  DropCapabilitiesBoundingSet(fail_fn);

  bool use_native_bridge = !is_system_server &&
                           instruction_set.has_value() &&
                           android::NativeBridgeAvailable() &&
                           android::NeedsNativeBridge(instruction_set.value().c_str());

  if (use_native_bridge && !app_data_dir.has_value()) {
    use_native_bridge = false;
    ALOGW("Native bridge will not be used because managed_app_data_dir == nullptr.");
  }

  MountEmulatedStorage(uid, mount_external, use_native_bridge, fail_fn);

  if (!is_system_server && getuid() == 0) {
      // 不是 system_server 的子进程,则创建进程组
    const int rc = createProcessGroup(uid, getpid());
  }

  // 设置 group
  SetGids(env, gids, fail_fn);
  // 设置资源 limit
  SetRLimits(env, rlimits, fail_fn);

  SetCapabilities(permitted_capabilities, effective_capabilities, permitted_capabilities, fail_fn);

  // 设置调度策略
  SetSchedulerPolicy(fail_fn);

  __android_log_close();
  stats_log_close();

  const char* se_info_ptr = se_info.has_value() ? se_info.value().c_str() : nullptr;
  const char* nice_name_ptr = nice_name.has_value() ? nice_name.value().c_str() : nullptr;

  // 设置 selinux 上下文
  if (selinux_android_setcontext(uid, is_system_server, se_info_ptr, nice_name_ptr) == -1) {
    fail_fn(CREATE_ERROR("selinux_android_setcontext(%d, %d, \"%s\", \"%s\") failed",
                         uid, is_system_server, se_info_ptr, nice_name_ptr));
  }

  if (nice_name.has_value()) {
    SetThreadName(nice_name.value());
  } else if (is_system_server) {
    SetThreadName("system_server");
  }

  // 把 signal 设置为默认函数
  UnsetChldSignalHandler();

  if (is_system_server) {
    env->CallStaticVoidMethod(gZygoteClass, gCallPostForkSystemServerHooks);
    if (env->ExceptionCheck()) {
      fail_fn("Error calling post fork system server hooks.");
    }

    env->CallStaticVoidMethod(gZygoteInitClass, gCreateSystemServerClassLoader);
    if (env->ExceptionCheck()) {
      env->ExceptionClear();
    }

    static const char* kSystemServerLabel = "u:r:system_server:s0";
    if (selinux_android_setcon(kSystemServerLabel) != 0) {
      fail_fn(CREATE_ERROR("selinux_android_setcon(%s)", kSystemServerLabel));
    }
  }

  env->CallStaticVoidMethod(gZygoteClass, gCallPostForkChildHooks, runtime_flags,
                            is_system_server, is_child_zygote, managed_instruction_set);

  if (env->ExceptionCheck()) {
    fail_fn("Error calling post fork hooks.");
  }
}

System Server 创建好了,就需要去处理自己的事情了,在文章开头中 System Server 创建好了之后,会调用 handleSystemServerProcess 去完成自己的使命。

handleSystemServerProcess

/frameworks/base/core/java/com/android/internal/os/ZygoteInit.java

 1
 2
 3
 4
 5
 6
 7
 8
 9
10
11
12
13
14
15
16
17
18
19
20
21
22
23
24
25
26
27
28
29
30
31
32
33
34
35
36
37
38
39
40
41
42
43
44
45
46
47
48
49
50
51
52
53
private static Runnable handleSystemServerProcess(ZygoteArguments parsedArgs) {
    // set umask to 0077 so new files and directories will default to owner-only permissions.
    Os.umask(S_IRWXG | S_IRWXO);

    if (parsedArgs.mNiceName != null) {
        Process.setArgV0(parsedArgs.mNiceName);
    }

    final String systemServerClasspath = Os.getenv("SYSTEMSERVERCLASSPATH");
    if (systemServerClasspath != null) {
        // 优化 dex
        if (performSystemServerDexOpt(systemServerClasspath)) {
            sCachedSystemServerClassLoader = null;
        }
        boolean profileSystemServer = SystemProperties.getBoolean(
            "dalvik.vm.profilesystemserver", false);
        if (profileSystemServer && (Build.IS_USERDEBUG || Build.IS_ENG)) {
            try {
                prepareSystemServerProfile(systemServerClasspath);
            } catch (Exception e) {
                Log.wtf(TAG, "Failed to set up system server profile", e);
            }
        }
    }

    if (parsedArgs.mInvokeWith != null) {
        String[] args = parsedArgs.mRemainingArgs;
        if (systemServerClasspath != null) {
            String[] amendedArgs = new String[args.length + 2];
            amendedArgs[0] = "-cp";
            amendedArgs[1] = systemServerClasspath;
            System.arraycopy(args, 0, amendedArgs, 2, args.length);
            args = amendedArgs;
        }
        // 启动应用进程
        WrapperInit.execApplication(parsedArgs.mInvokeWith,
                                    parsedArgs.mNiceName, parsedArgs.mTargetSdkVersion,
                                    VMRuntime.getCurrentInstructionSet(), null, args);

        throw new IllegalStateException("Unexpected return from WrapperInit.execApplication");
    } else {
        // 创建类加载器
        createSystemServerClassLoader();
        ClassLoader cl = sCachedSystemServerClassLoader;
        if (cl != null) {
            Thread.currentThread().setContextClassLoader(cl);
        }
        // SystemServer 进入此分支
        return ZygoteInit.zygoteInit(parsedArgs.mTargetSdkVersion,
                                                    parsedArgs.mRemainingArgs, cl);
    }

}

handleSystemServerProcess 会对 dex 进行优化, systemServerClasspath 环境变量主要有 /system/framwork 下的 services.jarethernet-service.jarwif-service.jar

然后创建类加载器,最后调用 ZygoteInit.zygoteInit

performSystemServerDexOpt

/frameworks/base/core/java/com/android/internal/os/ZygoteInit.java

 1
 2
 3
 4
 5
 6
 7
 8
 9
10
11
12
13
14
15
16
17
18
19
20
21
22
23
24
25
26
27
28
29
30
31
32
33
34
35
36
37
38
39
40
41
42
43
44
45
46
47
48
49
50
51
52
53
private static boolean performSystemServerDexOpt(String classPath) {
    final String[] classPathElements = classPath.split(":");
    final IInstalld installd = IInstalld.Stub
            .asInterface(ServiceManager.getService("installd"));
    final String instructionSet = VMRuntime.getRuntime().vmInstructionSet();

    String classPathForElement = "";
    boolean compiledSomething = false;
    for (String classPathElement : classPathElements) {
        String systemServerFilter = SystemProperties.get(
                "dalvik.vm.systemservercompilerfilter", "speed");

        int dexoptNeeded;
        try {
            dexoptNeeded = DexFile.getDexOptNeeded(
                    classPathElement, instructionSet, systemServerFilter,
                    null /* classLoaderContext */, false /* newProfile */,
                    false /* downgrade */);
        } catch (FileNotFoundException ignored) {
            continue;
        } catch (IOException e) {
            dexoptNeeded = DexFile.NO_DEXOPT_NEEDED;
        }

        if (dexoptNeeded != DexFile.NO_DEXOPT_NEEDED) {
            final String packageName = "*";
            final String outputPath = null;
            final int dexFlags = 0;
            final String compilerFilter = systemServerFilter;
            final String uuid = StorageManager.UUID_PRIVATE_INTERNAL;
            final String seInfo = null;
            final String classLoaderContext =
                    getSystemServerClassLoaderContext(classPathForElement);
            final int targetSdkVersion = 0;  // SystemServer targets the system's SDK version
            try {
                installd.dexopt(classPathElement, Process.SYSTEM_UID, packageName,
                        instructionSet, dexoptNeeded, outputPath, dexFlags, compilerFilter,
                        uuid, classLoaderContext, seInfo, false /* downgrade */,
                        targetSdkVersion, /*profileName*/ null, /*dexMetadataPath*/ null,
                        "server-dexopt");
                compiledSomething = true;
            } catch (RemoteException | ServiceSpecificException e) {
                Log.w(TAG, "Failed compiling classpath element for system server: "
                        + classPathElement, e);
            }
        }

        classPathForElement = encodeSystemServerClassPath(
                classPathForElement, classPathElement);
    }

    return compiledSomething;
}

使用 socket 通信将优化操作交给 installed 执行。

zygoteInit

/frameworks/base/core/java/com/android/internal/os/ZygoteInit.java

1
2
3
4
5
6
7
8
public static final Runnable zygoteInit(int targetSdkVersion, String[] argv,
                                        ClassLoader classLoader) {
    RuntimeInit.redirectLogStreams();

    RuntimeInit.commonInit();
    ZygoteInit.nativeZygoteInit();
    return RuntimeInit.applicationInit(targetSdkVersion, argv, classLoader);
}

commonInit

/frameworks/base/core/java/com/android/internal/os/RuntimeInit.java

 1
 2
 3
 4
 5
 6
 7
 8
 9
10
11
12
13
14
15
16
17
18
19
20
protected static final void commonInit() {
    LoggingHandler loggingHandler = new LoggingHandler();
    RuntimeHooks.setUncaughtExceptionPreHandler(loggingHandler);
    // 设置默认异常未捕获处理方法
    Thread.setDefaultUncaughtExceptionHandler(new KillApplicationHandler(loggingHandler));
    // 设置时区
    RuntimeHooks.setTimeZoneIdSupplier(() -> SystemProperties.get("persist.sys.timezone"));

    LogManager.getLogManager().reset();
    new AndroidConfig();

    // 设置 http userAgent
    String userAgent = getDefaultUserAgent();
    System.setProperty("http.agent", userAgent);

    // 设置 socket tag, 用于流量统计
    NetworkManagementSocketTagger.install();

    initialized = true;
}

nativeZygoteInit

/frameworks/base/core/jni/AndroidRuntime.cpp

1
2
3
4
static void com_android_internal_os_ZygoteInit_nativeZygoteInit(JNIEnv* env, jobject clazz)
{
    gCurRuntime->onZygoteInit();
}

gCurRuntimeAppRuntimeZygote 中有提到。所以 onZygoteInit 其实是 AppRuntime 的方法,他在 app_main.cpp 中。 /frameworks/base/cmds/app_process/app_main.cpp

1
2
3
4
5
6
virtual void onZygoteInit()
{
    sp<ProcessState> proc = ProcessState::self();
    ALOGV("App process: starting thread pool.\n");
    proc->startThreadPool(); // 启动线程池
}

onZygoteInit 方法中,主要启动了线程池,熟悉 Binder 的应该不陌生,在 ProcessState 中会打开 Binder 驱动,并调用 mmap 进行内核空间地址的映射。

applicationInit

/frameworks/base/core/java/com/android/internal/os/RuntimeInit.java

 1
 2
 3
 4
 5
 6
 7
 8
 9
10
11
12
13
protected static Runnable applicationInit(int targetSdkVersion, String[] argv,
        ClassLoader classLoader) {
    nativeSetExitWithoutCleanup(true);

    VMRuntime.getRuntime().setTargetHeapUtilization(0.75f);
    VMRuntime.getRuntime().setTargetSdkVersion(targetSdkVersion);

    final Arguments args = new Arguments(argv);

    Trace.traceEnd(Trace.TRACE_TAG_ACTIVITY_MANAGER);

    return findStaticMain(args.startClass, args.startArgs, classLoader);
}

这里的 startClasscom.android.server.SystemServer ,在文章开头中有提到过。

findStaticMain

/frameworks/base/core/java/com/android/internal/os/RuntimeInit.java

 1
 2
 3
 4
 5
 6
 7
 8
 9
10
11
12
13
14
15
16
17
18
19
20
21
22
23
24
25
26
27
28
29
30
31
protected static Runnable findStaticMain(String className, String[] argv,
        ClassLoader classLoader) {
    Class<?> cl;

    try {
        cl = Class.forName(className, true, classLoader);
    } catch (ClassNotFoundException ex) {
        throw new RuntimeException(
                "Missing class when invoking static main " + className,
                ex);
    }

    Method m;
    try {
        m = cl.getMethod("main", new Class[] { String[].class });
    } catch (NoSuchMethodException ex) {
        throw new RuntimeException(
                "Missing static main on " + className, ex);
    } catch (SecurityException ex) {
        throw new RuntimeException(
                "Problem getting static main on " + className, ex);
    }

    int modifiers = m.getModifiers();
    if (! (Modifier.isStatic(modifiers) && Modifier.isPublic(modifiers))) {
        throw new RuntimeException(
                "Main method is not public and static on " + className);
    }

    return new MethodAndArgsCaller(m, argv);
}

查找 com.android.server.SystemServer 中的 main 方法。然后创建了 MethodAndArgsCaller ,它是个内部静态类。
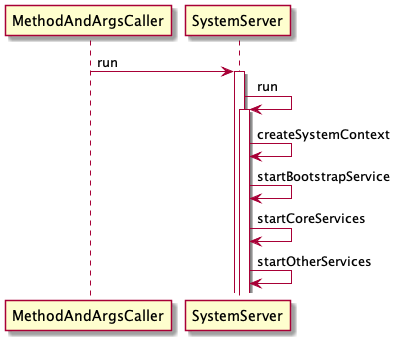
MethodAndArgsCaller

/frameworks/base/core/java/com/android/internal/os/RuntimeInit.java

 1
 2
 3
 4
 5
 6
 7
 8
 9
10
11
12
13
14
15
16
17
18
19
20
21
22
23
24
25
26
27
28
static class MethodAndArgsCaller implements Runnable {
    /** method to call */
    private final Method mMethod;

    /** argument array */
    private final String[] mArgs;

    public MethodAndArgsCaller(Method method, String[] args) {
        mMethod = method;
        mArgs = args;
    }

    public void run() {
        try {
            mMethod.invoke(null, new Object[] { mArgs });
        } catch (IllegalAccessException ex) {
            throw new RuntimeException(ex);
        } catch (InvocationTargetException ex) {
            Throwable cause = ex.getCause();
            if (cause instanceof RuntimeException) {
                throw (RuntimeException) cause;
            } else if (cause instanceof Error) {
                throw (Error) cause;
            }
            throw new RuntimeException(ex);
        }
    }
}

MethodAndArgsCaller 实现了 Runnable ,在 run 方法中,调用了上一步找到的 main 方法。但是我们并没有发现有地方调用了 run 方法。

我们往上走一路溯源到 Zygote 中,发现了 run 方法的调用,也就是文章的最开头。乍一看可能会以为是个线程,其实不是只是个普通调用。就像 Handler 中的 Callback 一样,都是普通方法调用。

 1
 2
 3
 4
 5
 6
 7
 8
 9
10
11
12
13
14
15
public static void main(String argv[]) {
    ZygoteServer zygoteServer = null;
        // 通过 Socket 方式创建 ZygoteServer
    zygoteServer = new ZygoteServer(isPrimaryZygote);

    if (startSystemServer) {
        // 创建 SystemServer 进程
        Runnable r = forkSystemServer(abiList, zygoteSocketName, zygoteServer);

        if (r != null) {
            r.run(); // 调用 run
            return;
        }
    }
}

run 方法调用之后就进入到 SystemServer.main 方法中了。

小结 SystemServer 创建过程

画个时序图小结一下 SystemServer 的创建过程

SystemServer.main

/frameworks/base/services/java/com/android/server/SystemServer.java

 1
 2
 3
 4
 5
 6
 7
 8
 9
10
11
public static void main(String[] args) {
    new SystemServer().run();
}

public SystemServer() {
    mFactoryTestMode = FactoryTest.getMode();
    mStartCount = SystemProperties.getInt(SYSPROP_START_COUNT, 0) + 1;
    mRuntimeStartElapsedTime = SystemClock.elapsedRealtime();
    mRuntimeStartUptime = SystemClock.uptimeMillis();
    mRuntimeRestart = "1".equals(SystemProperties.get("sys.boot_completed"));
}

创建了 SystemServer 构造方法没什么好说的,我们直接看 run 方法。

SystemServer.run

/frameworks/base/services/java/com/android/server/SystemServer.java

 1
 2
 3
 4
 5
 6
 7
 8
 9
10
11
12
13
14
15
16
17
18
19
20
21
22
23
24
25
26
27
28
29
30
31
32
33
34
35
36
37
38
39
40
41
42
43
44
45
46
47
48
49
50
51
52
53
54
55
56
57
58
59
60
61
62
63
64
65
66
67
68
69
70
71
72
73
74
75
76
77
78
79
80
81
82
83
84
private void run() {
    try {

        // 设置时间,最小是1970年,不能再早了
        if (System.currentTimeMillis() < EARLIEST_SUPPORTED_TIME) {
            Slog.w(TAG, "System clock is before 1970; setting to 1970.");
            SystemClock.setCurrentTimeMillis(EARLIEST_SUPPORTED_TIME);
        }

        String timezoneProperty = SystemProperties.get("persist.sys.timezone");
        if (timezoneProperty == null || timezoneProperty.isEmpty()) {
            Slog.w(TAG, "Timezone not set; setting to GMT.");
            SystemProperties.set("persist.sys.timezone", "GMT");
        }

        // 设置语言
        if (!SystemProperties.get("persist.sys.language").isEmpty()) {
            final String languageTag = Locale.getDefault().toLanguageTag();

            SystemProperties.set("persist.sys.locale", languageTag);
            SystemProperties.set("persist.sys.language", "");
            SystemProperties.set("persist.sys.country", "");
            SystemProperties.set("persist.sys.localevar", "");
        }

        Binder.setWarnOnBlocking(true);
        // 设置虚拟机运行库路径
        SystemProperties.set("persist.sys.dalvik.vm.lib.2", VMRuntime.getRuntime().vmLibrary());
        // 清除内存上限
        VMRuntime.getRuntime().clearGrowthLimit();
        // 设置内存有效利用率0.8
        VMRuntime.getRuntime().setTargetHeapUtilization(0.8f);
        // 确认指纹信息
        Build.ensureFingerprintProperty();
        // 设置环境变量前,指定用户
        Environment.setUserRequired(true);

        BaseBundle.setShouldDefuse(true);

        Parcel.setStackTraceParceling(true);
        // 设置 Binder 优先级,确保在前台
        BinderInternal.disableBackgroundScheduling(true);
        BinderInternal.setMaxThreads(sMaxBinderThreads);
        android.os.Process.setThreadPriority(
                android.os.Process.THREAD_PRIORITY_FOREGROUND);
        android.os.Process.setCanSelfBackground(false);
        // 设置当前线程为主线程,初始化Looper
        Looper.prepareMainLooper();
        Looper.getMainLooper().setSlowLogThresholdMs(
                SLOW_DISPATCH_THRESHOLD_MS, SLOW_DELIVERY_THRESHOLD_MS);

        // 加载android_servers.so,源码在frameworks/base/services
        System.loadLibrary("android_servers");

        // 检测上次关机是否失败
        performPendingShutdown();
        // 创建系统上下文
        createSystemContext();
        // 创建服务管理系统
        mSystemServiceManager = new SystemServiceManager(mSystemContext);
        mSystemServiceManager.setStartInfo(mRuntimeRestart,
                mRuntimeStartElapsedTime, mRuntimeStartUptime);
        LocalServices.addService(SystemServiceManager.class, mSystemServiceManager);
        // Prepare the thread pool for init tasks that can be parallelized
        SystemServerInitThreadPool.get();
    } finally {
        traceEnd();  // InitBeforeStartServices
    }

    try {
        traceBeginAndSlog("StartServices");
        startBootstrapServices(); // 启动引导服务
        startCoreServices(); // 启动核心服务
        startOtherServices(); // 启动其他服务
        SystemServerInitThreadPool.shutdown();
    } catch (Throwable ex) {
        throw ex;
    } finally {
        traceEnd();
    }

    Looper.loop();
    throw new RuntimeException("Main thread loop unexpectedly exited");
}

main 方法中做的事有点多,比较复杂,大概有这么几个

  1. 检测时间,比1970早,那就改成1970,不能比这个更早了。
  2. 设置语言
  3. 设置虚拟机运行库路径为 persist.sys.dalvik.vm.lib.2
  4. 设置虚拟机参数,清除内存上限,设置利用率等
  5. 设置Binder 线程为前台优先级
  6. 创建Looper
  7. 加载 libandroid_servers.so
  8. 检测上次关机是否失败
  9. 创建上下文
  10. 创建 SystemServiceManager
  11. 启动引导服务、核心服务、其它服务
  12. 调用 Loop 开启循环

createSystemContext

/frameworks/base/services/java/com/android/server/SystemServer.java

1
2
3
4
5
6
7
8
private void createSystemContext() {
    ActivityThread activityThread = ActivityThread.systemMain();
    mSystemContext = activityThread.getSystemContext();
    mSystemContext.setTheme(DEFAULT_SYSTEM_THEME);

    final Context systemUiContext = activityThread.getSystemUiContext();
    systemUiContext.setTheme(DEFAULT_SYSTEM_THEME);
}

systemMain

/frameworks/base/core/java/android/app/ActivityThread.java

1
2
3
4
5
6
7
8
public static ActivityThread systemMain() {
    ActivityThread thread = new ActivityThread();
    thread.attach(true, 0);
    return thread;
}
ActivityThread() {
    mResourcesManager = ResourcesManager.getInstance();
}

调用 attatch ,和普通应用的创建类似。

 1
 2
 3
 4
 5
 6
 7
 8
 9
10
11
12
13
14
15
16
17
18
19
20
21
22
23
private void attach(boolean system, long startSeq) {
    sCurrentActivityThread = this;
    mSystemThread = system;
    if (!system) {
        // ...
    } else {
        android.ddm.DdmHandleAppName.setAppName("system_process",
                UserHandle.myUserId());
        try {
            mInstrumentation = new Instrumentation();
            mInstrumentation.basicInit(this);
            ContextImpl context = ContextImpl.createAppContext(
                    this, getSystemContext().mPackageInfo);
            mInitialApplication = context.mPackageInfo.makeApplication(true, null);
            mInitialApplication.onCreate();
        } catch (Exception e) {
            throw new RuntimeException(
                    "Unable to instantiate Application():" + e.toString(), e);
        }
    }

    // ...
}

创建 InstrumentationContextImplApplication 和应用进程创建类似。都是同一个套路,这样大家理解起来也容易。

startBootstrapServices

 1
 2
 3
 4
 5
 6
 7
 8
 9
10
11
12
13
14
15
16
17
18
19
20
21
22
23
24
25
26
27
28
29
30
31
32
33
34
35
36
37
38
39
40
41
42
43
44
45
46
47
48
49
50
51
52
53
54
55
56
57
58
59
60
61
62
63
64
65
66
67
68
69
70
71
72
73
74
private void startBootstrapServices() {
    // 启动 Watchdog ,尽可能早,如果在早期发生死锁,就让system server crash
    final Watchdog watchdog = Watchdog.getInstance();
    watchdog.start();
    // 等待 install 服务启动完成,以便它又机会创建适当权限的目录,比如 /data/user. 在其它服务初始化之前我们需要保证
    Installer installer = mSystemServiceManager.startService(Installer.class);
    // 启动 DeviceIdentifiersPolicyService 在 ActivityManager 之前
    mSystemServiceManager.startService(DeviceIdentifiersPolicyService.class);
    // 启动 UriGrantsManagerService
    mSystemServiceManager.startService(UriGrantsManagerService.Lifecycle.class);

    // 启动ActivityTaskManagerService
    ActivityTaskManagerService atm = mSystemServiceManager.startService(
            ActivityTaskManagerService.Lifecycle.class).getService();
    // 启动 ActivityManagerService
    mActivityManagerService = ActivityManagerService.Lifecycle.startService(
            mSystemServiceManager, atm);
    mActivityManagerService.setSystemServiceManager(mSystemServiceManager);
    mActivityManagerService.setInstaller(installer);
    mWindowManagerGlobalLock = atm.getGlobalLock();
    // 启动 PowerManagerService
    mPowerManagerService = mSystemServiceManager.startService(PowerManagerService.class);
    mSystemServiceManager.startService(ThermalManagerService.class);
    mActivityManagerService.initPowerManagement();
    // 启动 RecoverySystemService
    mSystemServiceManager.startService(RecoverySystemService.class);
    RescueParty.noteBoot(mSystemContext);
    // 启动 LightsService
    mSystemServiceManager.startService(LightsService.class);
    if (SystemProperties.getBoolean("config.enable_sidekick_graphics", false)) {
        mSystemServiceManager.startService(WEAR_SIDEKICK_SERVICE_CLASS);
    }
    // 启动 DisplayManagerService
    mDisplayManagerService = mSystemServiceManager.startService(DisplayManagerService.class);
    //
    mSystemServiceManager.startBootPhase(SystemService.PHASE_WAIT_FOR_DEFAULT_DISPLAY);
    String cryptState = VoldProperties.decrypt().orElse("");
    if (ENCRYPTING_STATE.equals(cryptState)) {
        Slog.w(TAG, "Detected encryption in progress - only parsing core apps");
        mOnlyCore = true;
    } else if (ENCRYPTED_STATE.equals(cryptState)) {
        Slog.w(TAG, "Device encrypted - only parsing core apps");
        mOnlyCore = true;
    }

    // Start the package manager.
    if (!mRuntimeRestart) {
        MetricsLogger.histogram(null, "boot_package_manager_init_start",
                (int) SystemClock.elapsedRealtime());
    }
    mFirstBoot = mPackageManagerService.isFirstBoot();
    mPackageManager = mSystemContext.getPackageManager();
    // 启动 UserManagerService
    mSystemServiceManager.startService(UserManagerService.LifeCycle.class);
    AttributeCache.init(mSystemContext);
    mActivityManagerService.setSystemProcess();
    watchdog.init(mSystemContext, mActivityManagerService);
    mDisplayManagerService.setupSchedulerPolicies();
    // 启动 OverlayManagerService
    mSystemServiceManager.startService(new OverlayManagerService(mSystemContext, installer));
    // 启动 SensorPrivacyService
    mSystemServiceManager.startService(new SensorPrivacyService(mSystemContext));

    if (SystemProperties.getInt("persist.sys.displayinset.top", 0) > 0) {
        mActivityManagerService.updateSystemUiContext();
        LocalServices.getService(DisplayManagerInternal.class).onOverlayChanged();
    }
    mSensorServiceStart = SystemServerInitThreadPool.get().submit(() -> {
        TimingsTraceLog traceLog = new TimingsTraceLog(
                SYSTEM_SERVER_TIMING_ASYNC_TAG, Trace.TRACE_TAG_SYSTEM_SERVER);
        // 启动 SensorService
        startSensorService();
    }, START_SENSOR_SERVICE);
}

startBootstrapServices 中创建了许多服务,有这么几个 ActivityManagerServicePowerManagerServiceRecoverySystemServiceLightsServiceDisplayManagerServiceUserManagerServiceOverlayManagerServiceSensorPrivacyServiceSensorService

startCoreServices

 1
 2
 3
 4
 5
 6
 7
 8
 9
10
11
12
13
14
15
16
17
18
19
20
21
22
23
24
25
26
27
28
29
private void startCoreServices() {
    // 启动 BatteryService
    mSystemServiceManager.startService(BatteryService.class);
    // 启动 UsageStateService
    mSystemServiceManager.startService(UsageStatsService.class);
    mActivityManagerService.setUsageStatsManager(
            LocalServices.getService(UsageStatsManagerInternal.class));
    if (mPackageManager.hasSystemFeature(PackageManager.FEATURE_WEBVIEW)) {
        // 启动 WebViewUpdateService
        mWebViewUpdateService = mSystemServiceManager.startService(WebViewUpdateService.class);
    }

    // 记录设备状态的缓存
    mSystemServiceManager.startService(CachedDeviceStateService.class);
    // 记录 cpu 花在 binder 调用的时间
    mSystemServiceManager.startService(BinderCallsStatsService.LifeCycle.class);

    // 用于记录 handle 处理所花费的时间
    mSystemServiceManager.startService(LooperStatsService.Lifecycle.class);

    // 管理 APK 的回滚
    mSystemServiceManager.startService(RollbackManagerService.class);

    // 用于 bug report 的 BugreportManagerService
    mSystemServiceManager.startService(BugreportManagerService.class);

    // 启动用于 GPU 和 GPU 驱动的 GpuSerivce
    mSystemServiceManager.startService(GpuService.class);
}

startCoreServices 中启动的服务比较少,主要的就 BatteryServiceUsageStateServiceWebViewUpdateService

startOtherServices

startOtherServices 太长了,这里精简了,留下重要的

 1
 2
 3
 4
 5
 6
 7
 8
 9
10
11
12
13
14
15
16
17
18
19
20
21
22
23
24
25
26
27
28
29
30
31
32
33
34
35
36
37
38
39
40
41
42
43
44
45
46
47
48
49
50
51
52
private void startOtherServices() {
    mSystemServiceManager.startService(KeyChainSystemService.class);
    ServiceManager.addService("scheduling_policy", new SchedulingPolicyService());
    mSystemServiceManager.startService(TelecomLoaderService.class);
    telephonyRegistry = new TelephonyRegistry(context);
    ServiceManager.addService("telephony.registry", telephonyRegistry);
    mEntropyMixer = new EntropyMixer(context);
    mContentResolver = context.getContentResolver();

    mSystemServiceManager.startService(ACCOUNT_SERVICE_CLASS);

    mSystemServiceManager.startService(CONTENT_SERVICE_CLASS);
    mActivityManagerService.installSystemProviders();
    mSystemServiceManager.startService(DropBoxManagerService.class);
    vibrator = new VibratorService(context);
    ServiceManager.addService("vibrator", vibrator);
    mSystemServiceManager.startService(new AlarmManagerService(context));
    inputManager = new InputManagerService(context);
    wm = WindowManagerService.main(context, inputManager, !mFirstBoot, mOnlyCore,
                                   new PhoneWindowManager(), mActivityManagerService.mActivityTaskManager);
    ServiceManager.addService(Context.WINDOW_SERVICE, wm, /* allowIsolated= */ false,
                              DUMP_FLAG_PRIORITY_CRITICAL | DUMP_FLAG_PROTO);
    ServiceManager.addService(Context.INPUT_SERVICE, inputManager,
                              false, DUMP_FLAG_PRIORITY_CRITICAL);
    mActivityManagerService.setWindowManager(wm);
    wm.onInitReady();
    inputManager.setWindowManagerCallbacks(wm.getInputManagerCallback());
    inputManager.start();
    mSystemServiceManager.startService(BluetoothService.class);
    statusBar = new StatusBarManagerService(context, wm);
    ServiceManager.addService(Context.STATUS_BAR_SERVICE, statusBar);
    networkStats = NetworkStatsService.create(context, networkManagement);
    ServiceManager.addService(Context.NETWORK_STATS_SERVICE, networkStats);
    mSystemServiceManager.startService(NotificationManagerService.class);

    mSystemServiceManager.startBootPhase(
        SystemService.PHASE_THIRD_PARTY_APPS_CAN_START);

    mSystemServiceManager.startService(AppBindingService.Lifecycle.class);
    vibrator.systemReady();
    lockSettings.systemReady();
    mSystemServiceManager.startBootPhase(SystemService.PHASE_LOCK_SETTINGS_READY);
    mSystemServiceManager.startBootPhase(SystemService.PHASE_SYSTEM_SERVICES_READY);
    mPowerManagerService.systemReady(mActivityManagerService.getAppOpsService());
    mSystemServiceManager.startService(PermissionPolicyService.class);
    mPackageManagerService.systemReady();
    mDisplayManagerService.systemReady(safeMode, mOnlyCore);
    mSystemServiceManager.startBootPhase(SystemService.PHASE_DEVICE_SPECIFIC_SERVICES_READY);
    mActivityManagerService.systemReady(() -> {

        }, BOOT_TIMINGS_TRACE_LOG);
}

startOtherServices 方法太长了,这里精简了大部分,这里和前面的方法一样也是启动了许多服务,最后调用了 AMS.systemReady ,这里是 AMS 的启动过程。

经过这个方法 SystemServer 中要启动的服务都启动完了,接着调用 loop 进入循环,等待消息到来。

服务启动阶段

这里借用 Android系统启动-SystemServer下篇 - Gityuan博客 | 袁辉辉的技术博客 中的图片来展示服务启动阶段 详细的过程可以移步至 Android系统启动-SystemServer下篇 - Gityuan博客 | 袁辉辉的技术博客 中,写的很好了,我就不再重复了。

总结

参考